Getting started guide (Administrator license)
We have created this guide so that you can set up the Lodago solution quickly and easily.
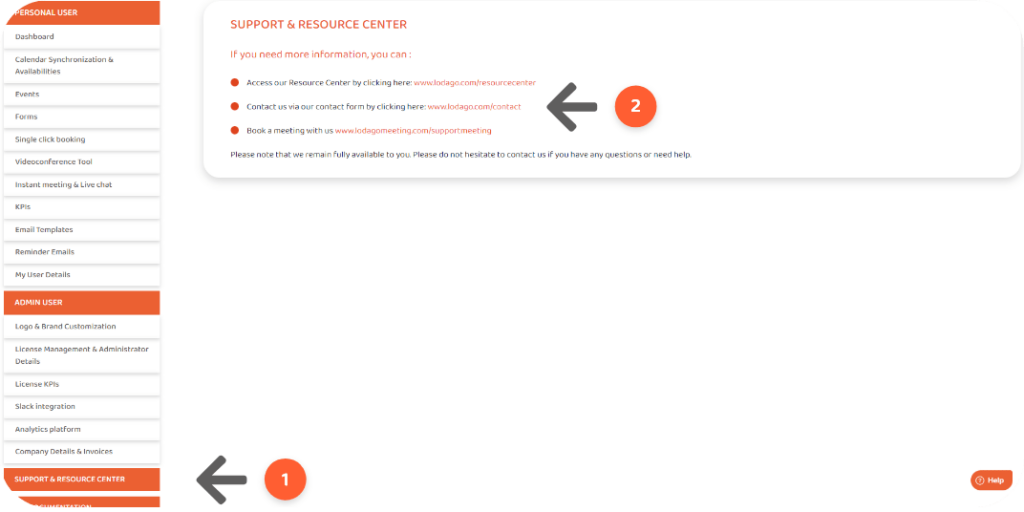
If you have any difficulties or questions, you can always contact us via our contact form or by booking a meeting with us.
Have you already had an onboarding session? If not, book an onboarding session with our Lodago officers by clicking here.
- Create your password
- Go to https://lodago.app/;
- Enter the email address you used to create your account;
- Click on “Forget password?”, you will receive an email;
- Click on the link in your email;
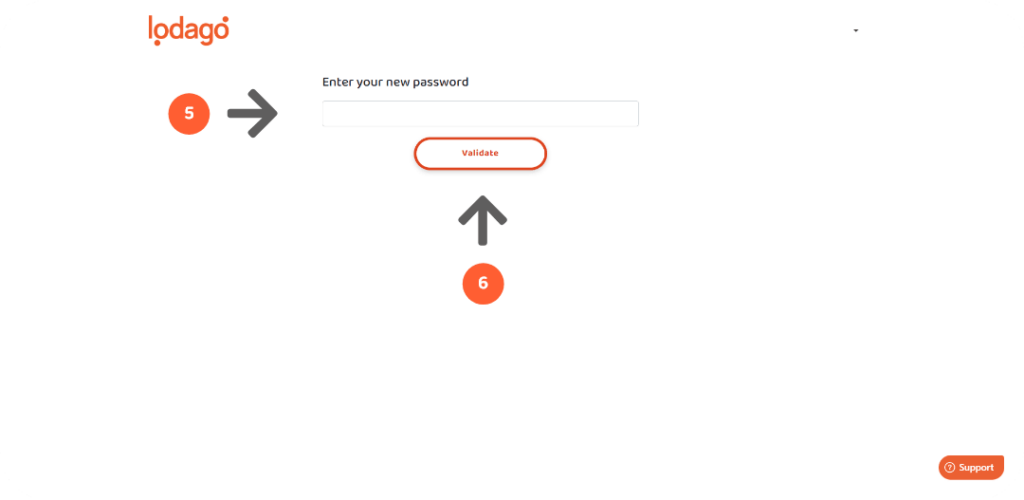
- Enter your new password;
- Click on validate.
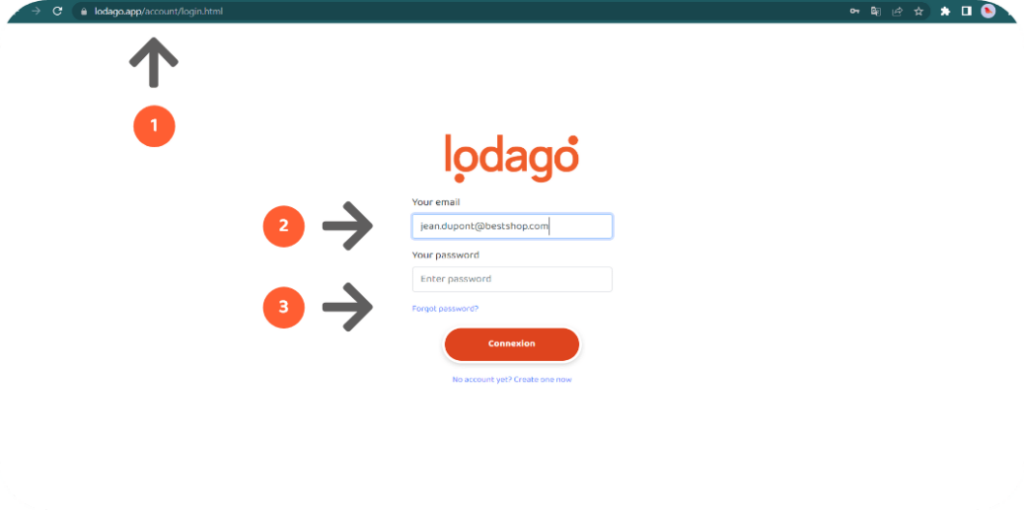
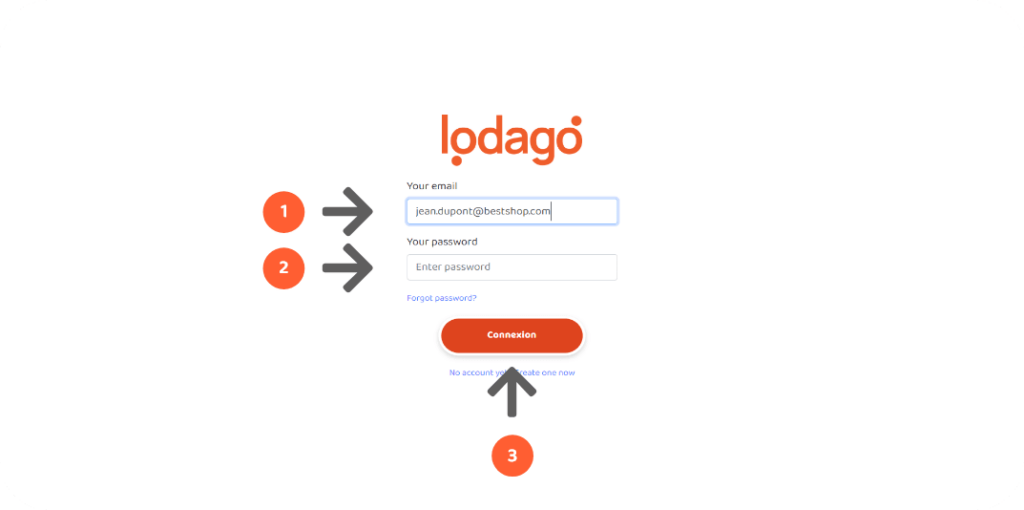
- Log in to your Lodago account: https://lodago.app/
- Enter your email address;
- Enter your password;
- Click on connexion.
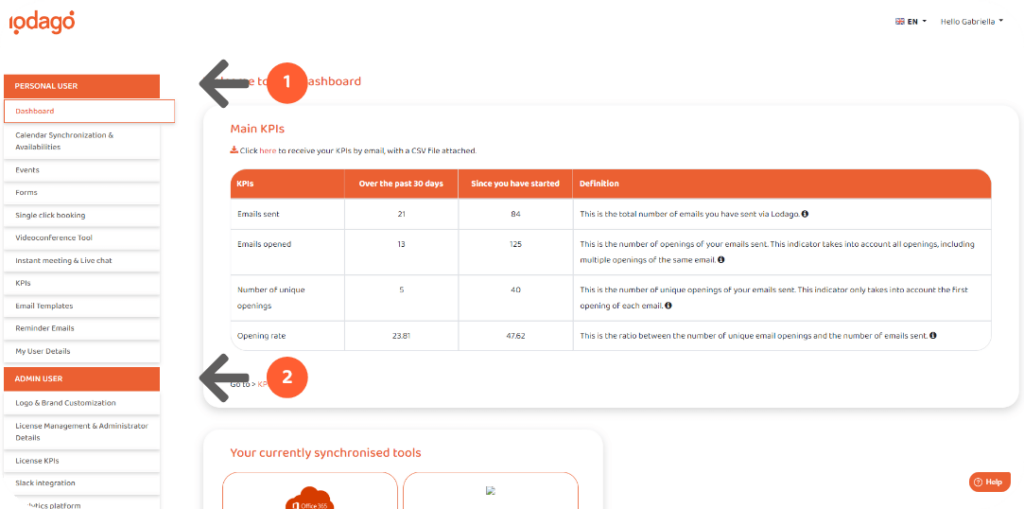
- Discover your account
You have two tab categories.
- One tab available to any Lodago user called “Personal User”;
- One tab exclusively available to admin users called “Admin User”.
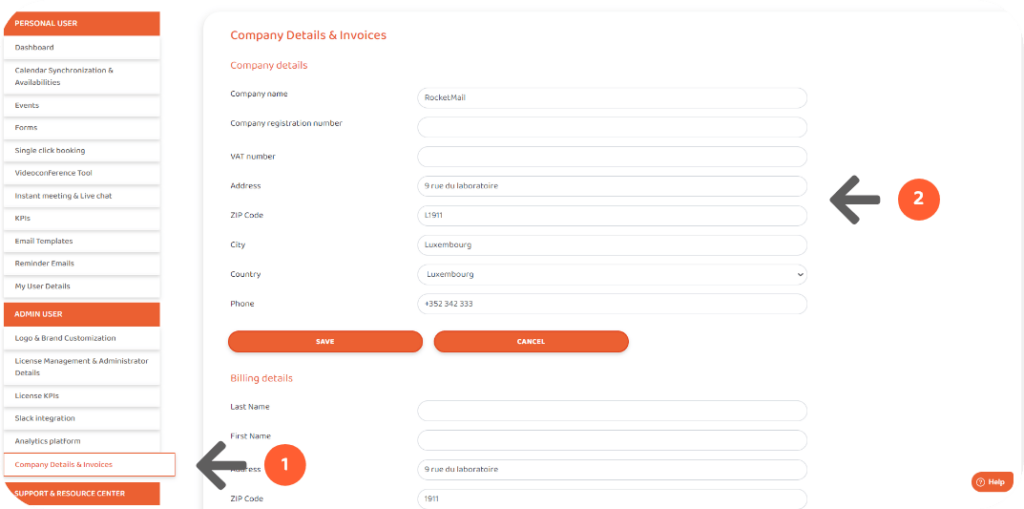
- Check your Company details
- Go to the “Company Details & Invoices” tab;
- Correct any detail that might be missing or incorrect.
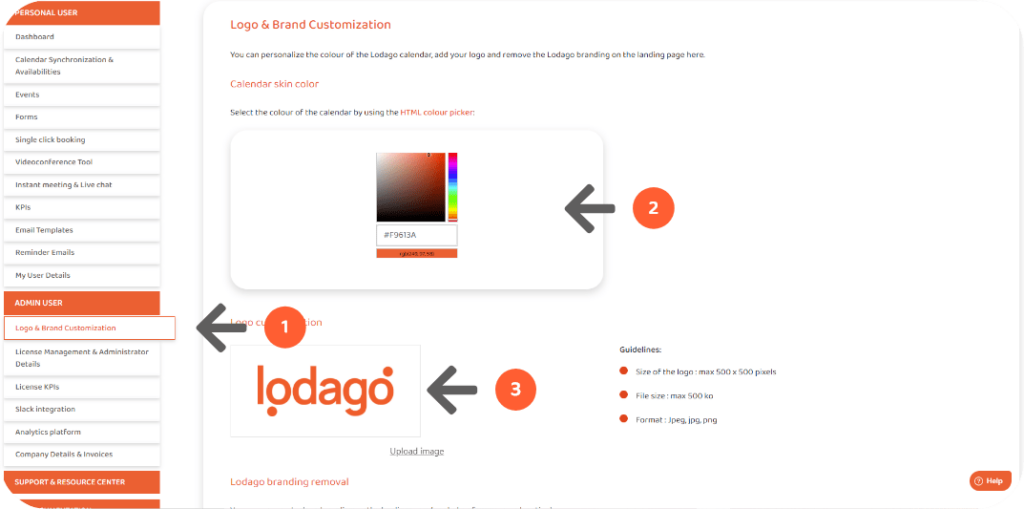
- Personalize the calendar to match your corporate identity
- Go to the “Logo & Brand customisation” tab;
- Use the colour picker to personalize the skin colour of your calendar;
- Check/Add your logo.
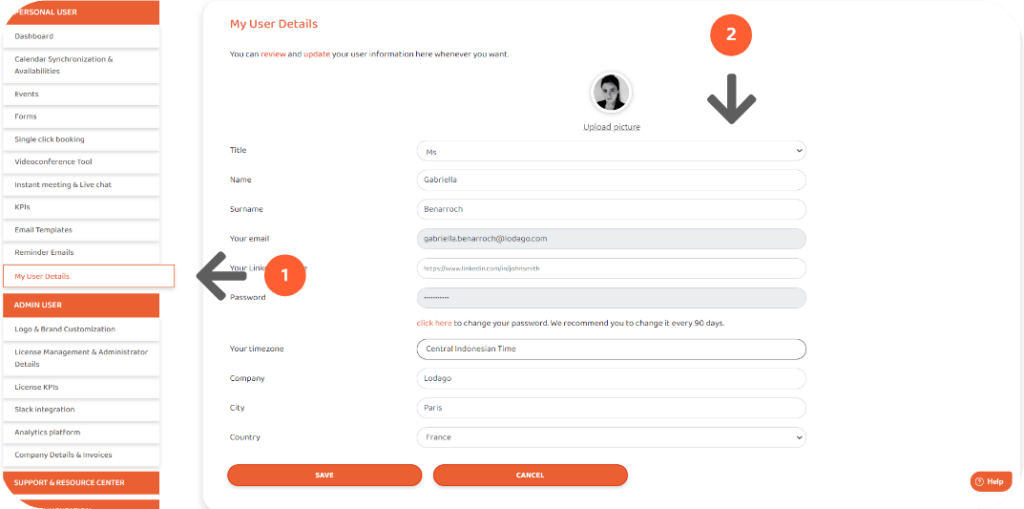
- Set up and check your user details
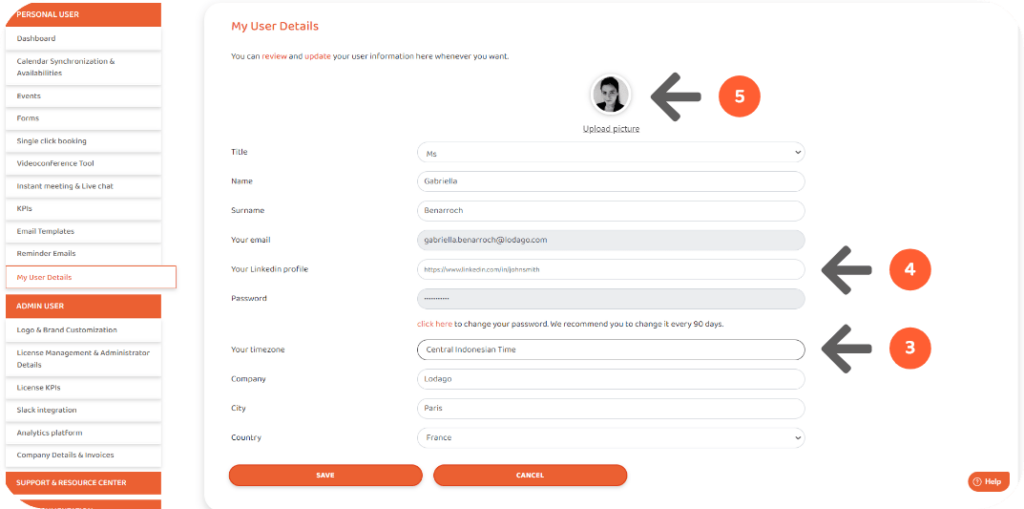
- Go to the “User details” tab;
- Check your user details;
- Add your timezone – don’t forget to update it when you travel, as your availabilities will be displayed based on this timezone;
- Add your Linkedin profile;
- Add your photo so that your prospects can directly visualise who you are when booking a meeting with you.
- Synchronize your calendar(s)
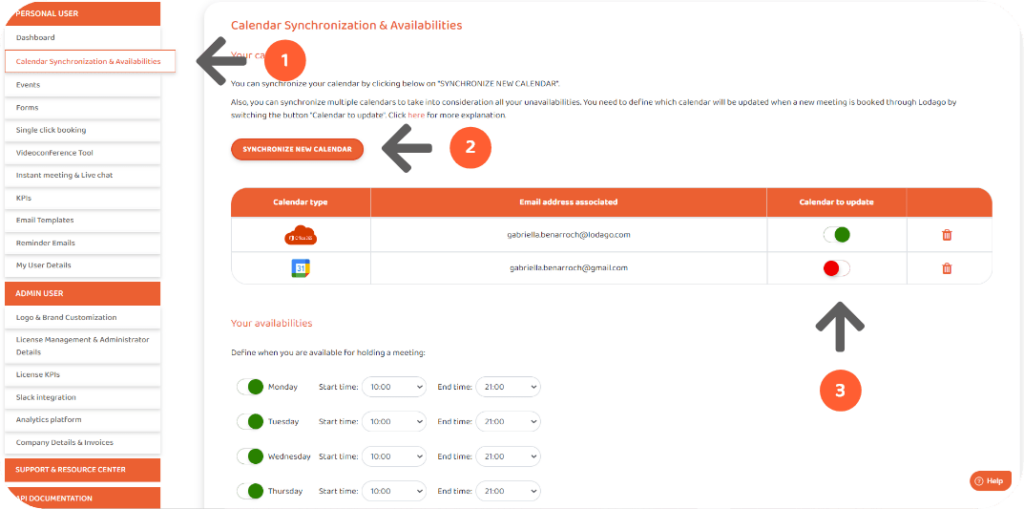
- Go to the “Calendar synchronization & Availabilities” tab;
- Synchronize your professional calendar(s). You can also synchronize your personal calendar if you wish;
- Check which calendar you want to be updated when a new meeting is booked if you synchronize several calendars.
- Set your general availability for holding meetings
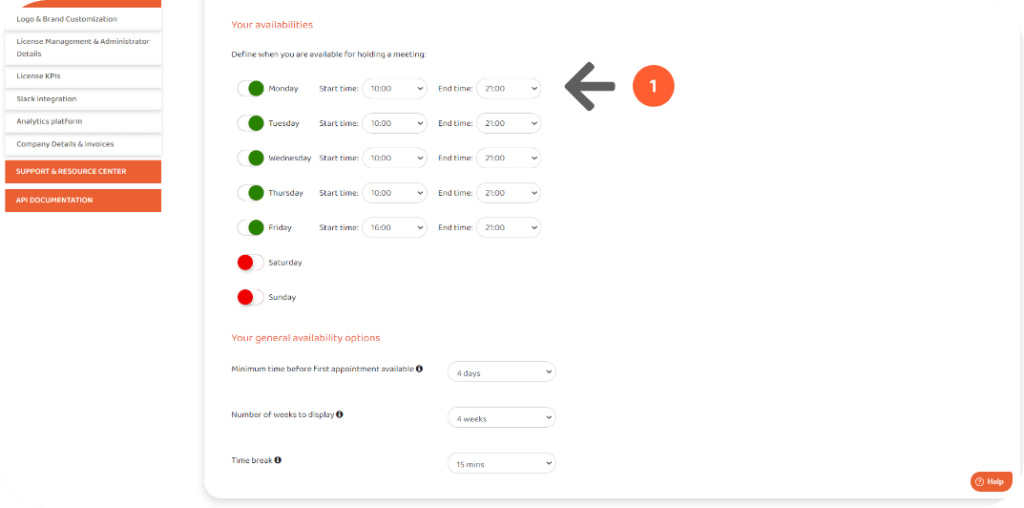
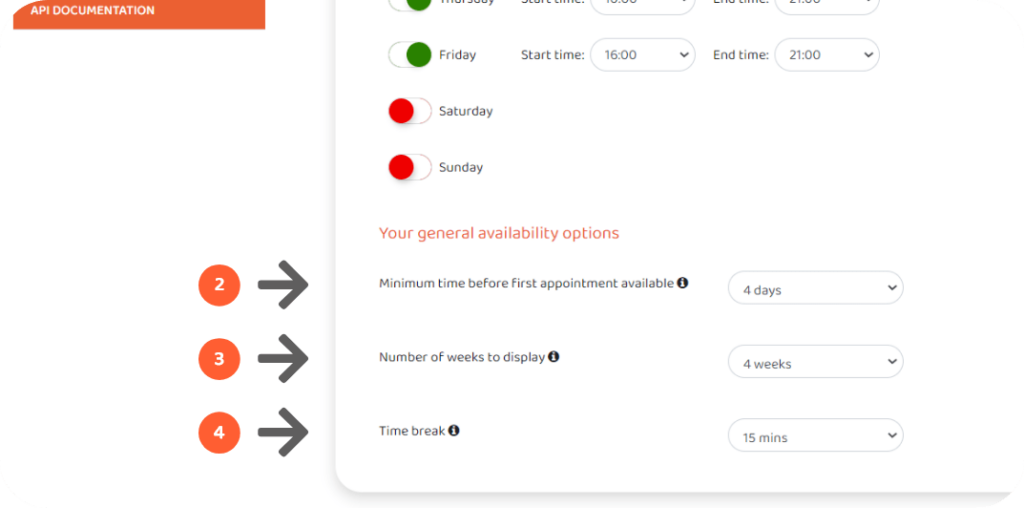
- Define the days and times when you are available for holding meetings;
Tips: When setting your availability to hold meetings, start by only setting your available time for Monday. Then, tick in Tuesday, Wednesday etc., so that the other days are already preset. - Set the time before the first available appointment. BE CAREFUL! If you choose “no minimum time”, you will get last-minute meetings;
- Set number of weeks to display – How many weeks are open for people to book a meeting with you;
- Set time break – The duration you make yourself unavailable for after holding a meeting.
- Set up instant meeting & Live chat
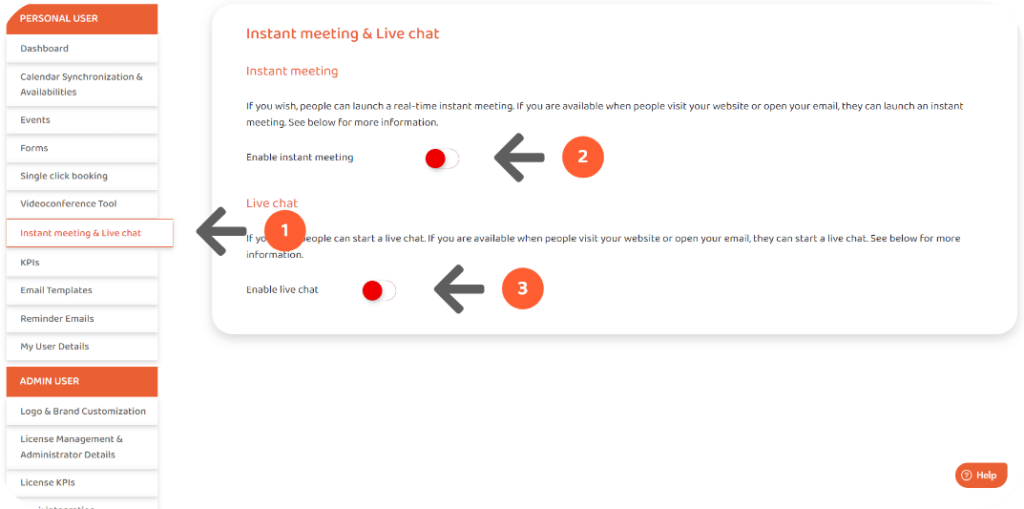
If you are available when people visit your website or open your email, you have the option of allowing them to start an instant meeting or live chat. If you are available, your email will display a live chat and/or instant meeting button (depending on your settings) under the calendar, so that your recipients can start either one of them.
- Go to “Instant meeting & Live chat”;
- Enable instant meeting;
- Enable live chat. Click here to look at the guide to see how you can connect your live chat with Lodago.
- Set up reminder emails
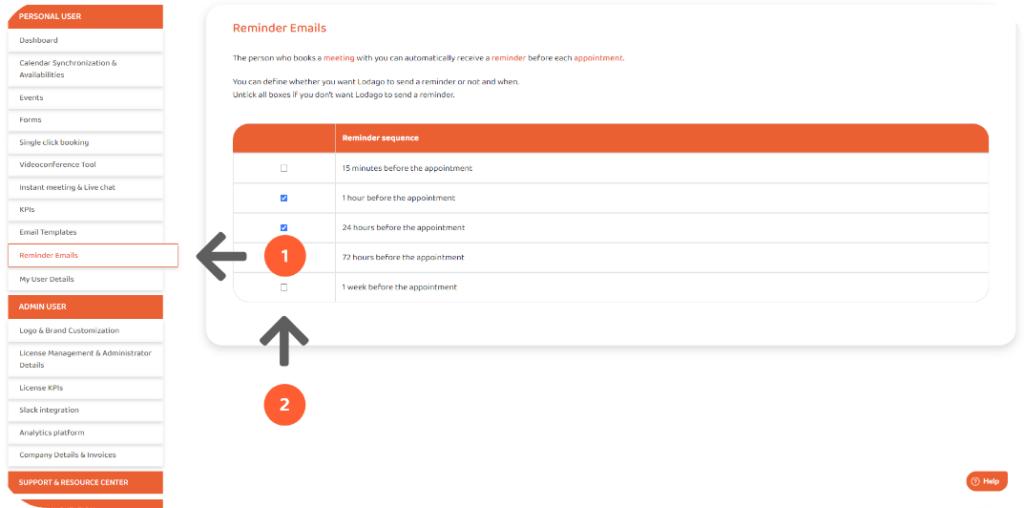
- Go to the “Reminder emails” tab;
- Check how many reminders you want to send before the meeting.
We recommend sending at least one reminder 24 hours before the meeting. This decreases the no show rate by reminding the the attendees of the meeting with a notification, while offering them a chance to reschedule the meeting in a seamless way.
If your meetings are usually booked weeks in advance, we recommend you to also send a reminder 72 hours before the meeting. If they are usually last minute meetings, we recommend you to send a reminder 1 hour before the meeting.
- Create, store and share email templates
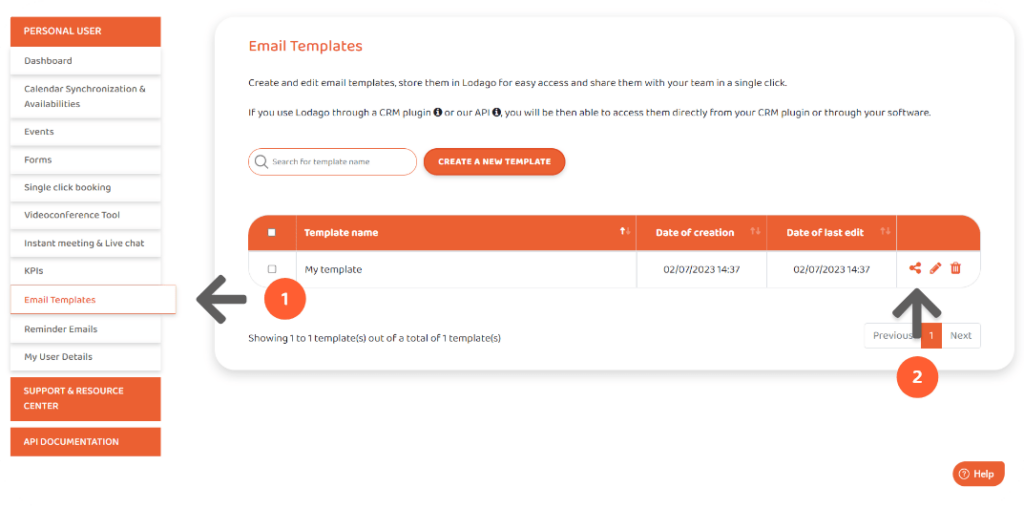
- Go to the “Email templates” tab;
- Click on “CREATE NEW TEMPLATE”;
- Share them with other Lodago users.
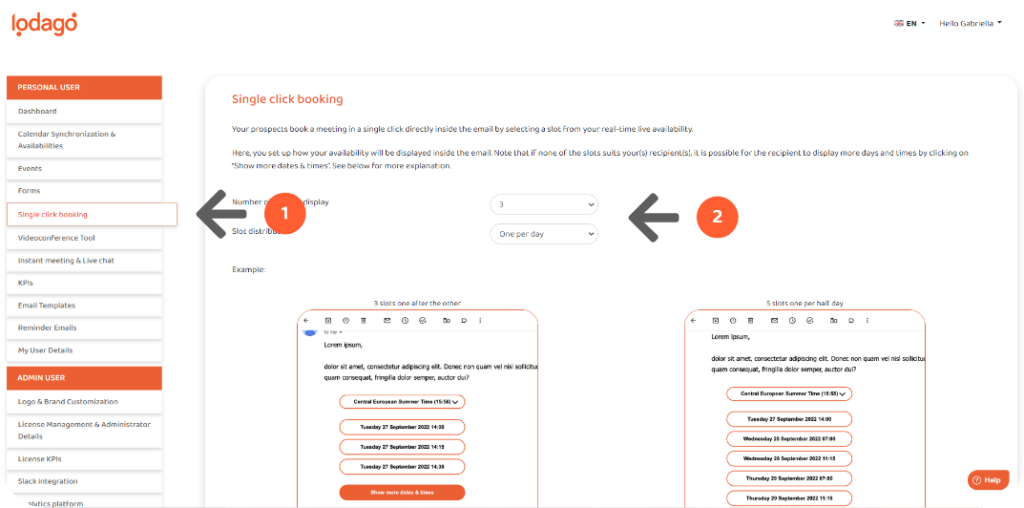
- Single click setting
- Go to the “Single click booking” tab;
- Set up your preferences by selecting the number of slots to display and the slot distribution.
People book a meeting in a single click directly inside the email by selecting a slot from your real-time availability. You need to set up the display of your availability inside the email.
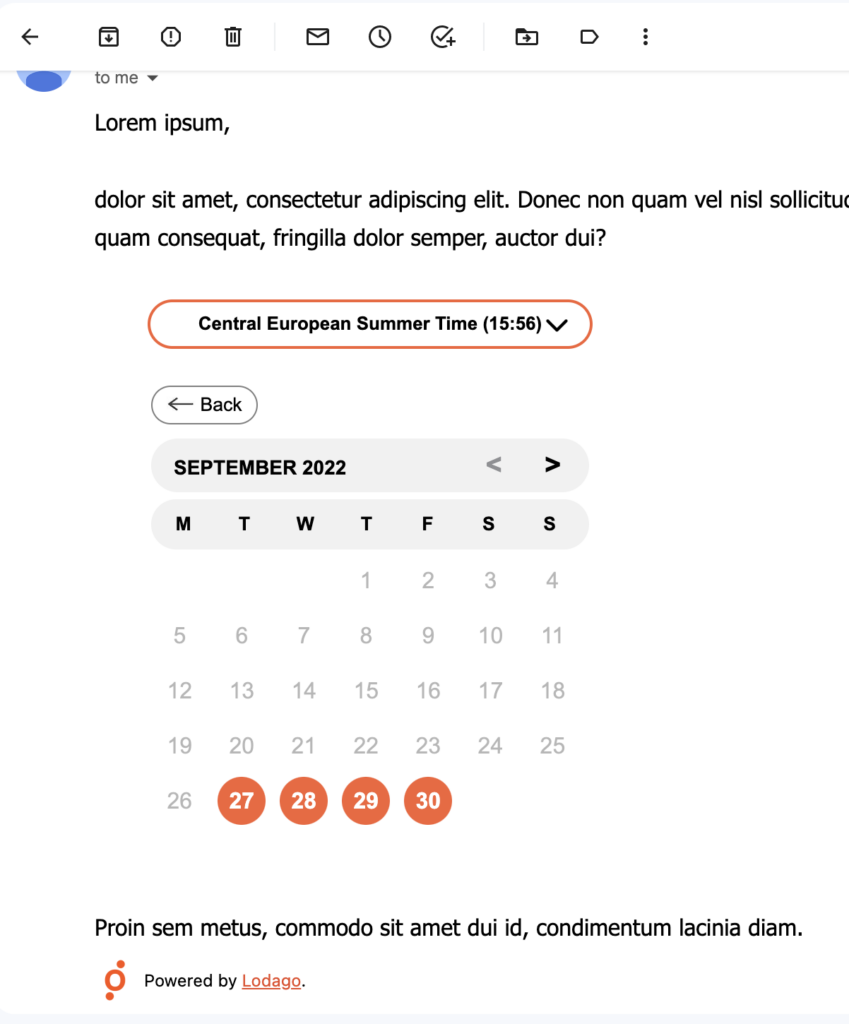
Please note that if none of the slots suits your(s) recipients, it is possible for the recipient(s) to display more days and times by clicking on “Show more dates & times”.
Your prospects book a meeting in a single click directly inside the email by selecting a slot from your real-time live availability.
Here, you set up how your availability will be displayed inside the email. Note that if none of the slots suits your(s) recipient(s), it is possible for the recipient to display more days and times by clicking on “Show more dates & times”. See below for more explanation.
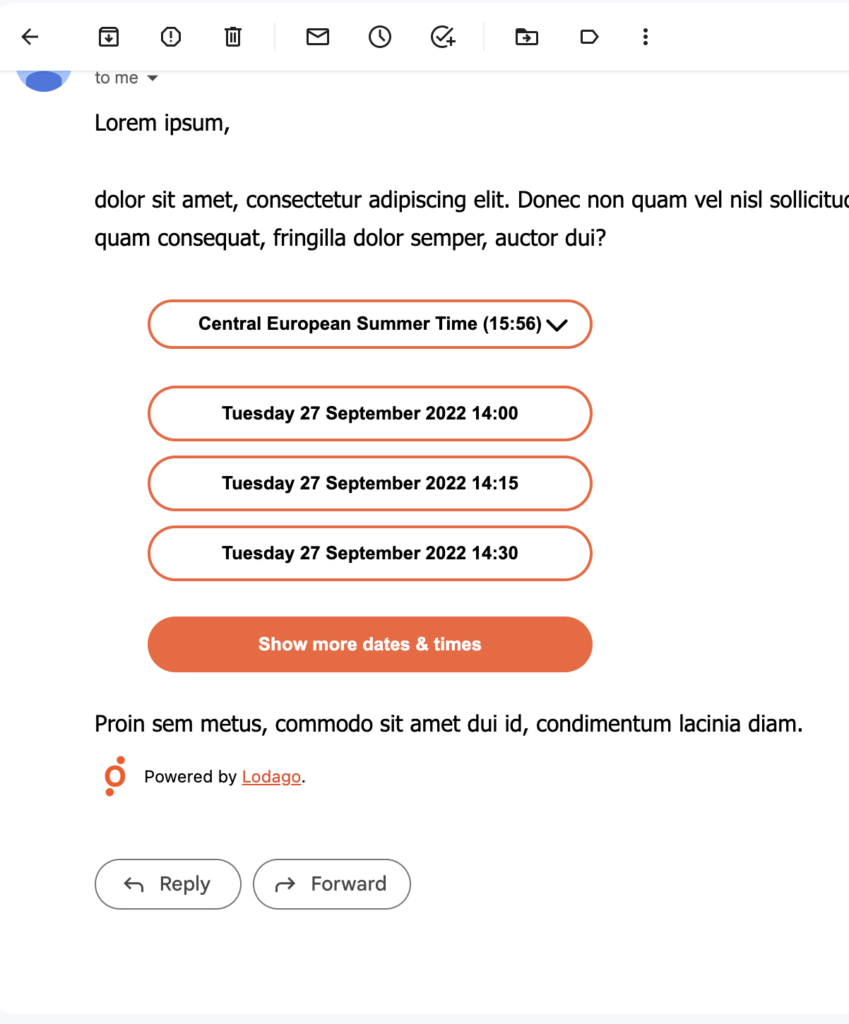
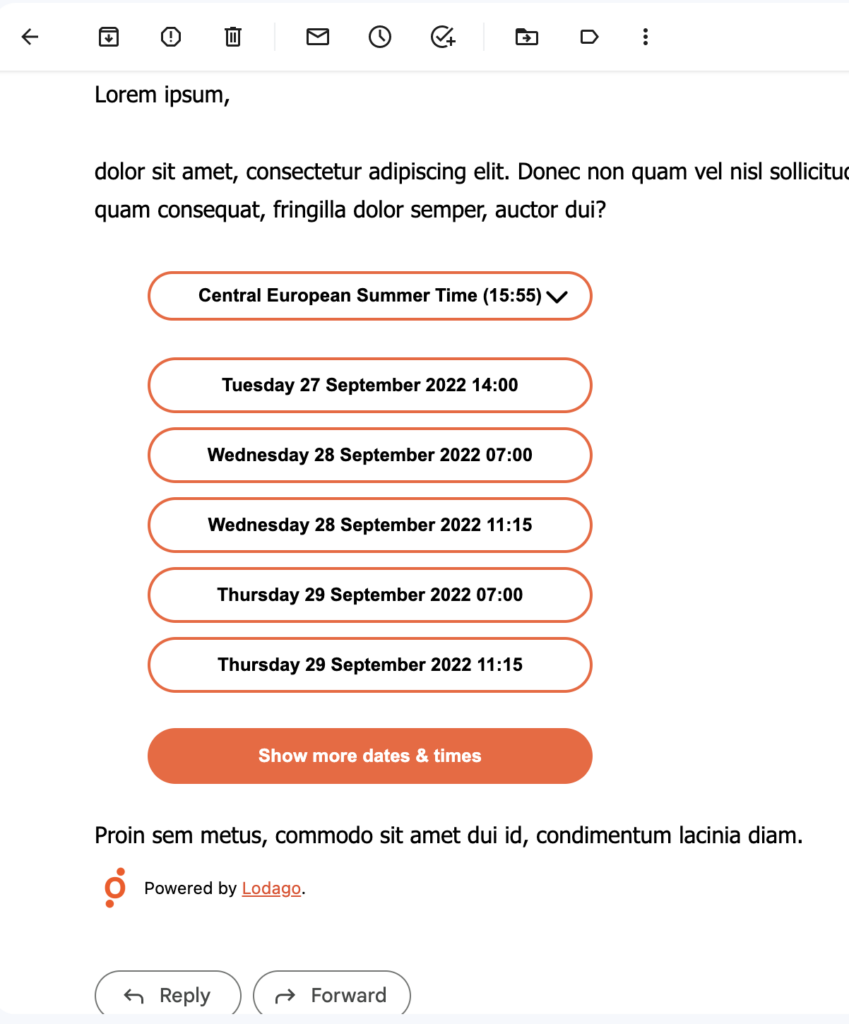
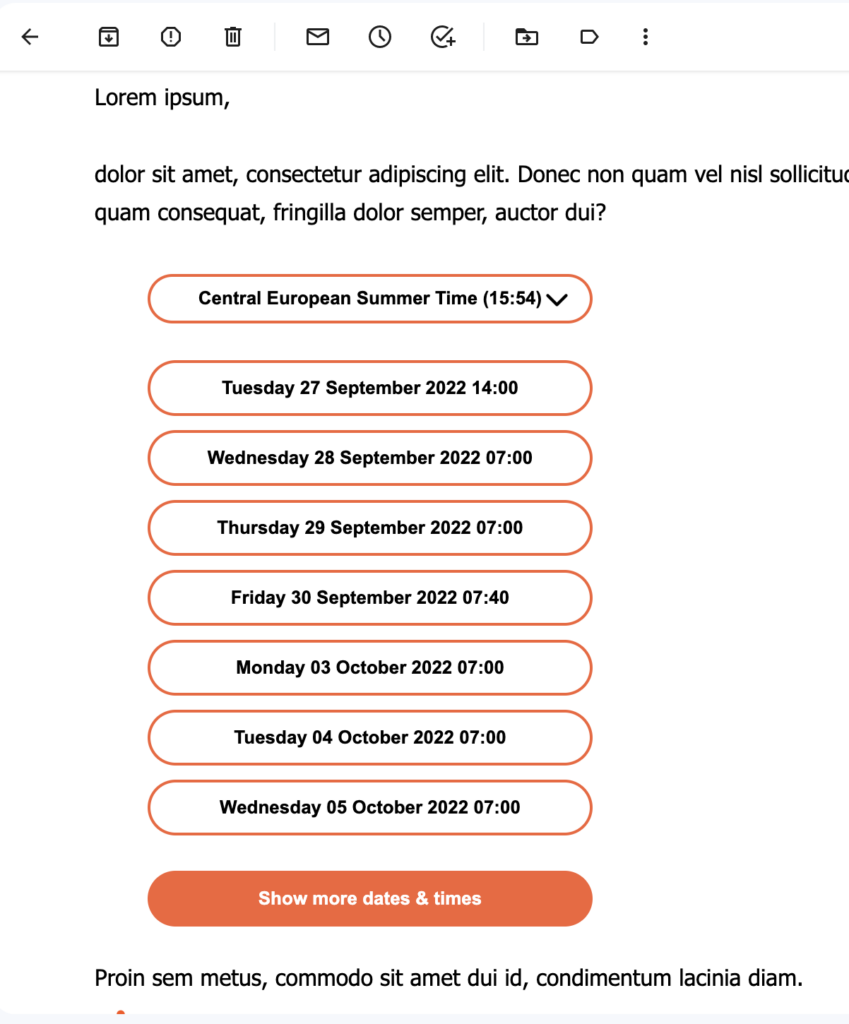
For customer success teams, we recommend 3 slots and one per day.
For sales and marketing teams, we recommend 3 slots and one per half day.
For support teams, we recommend 5 slots and one after another.
- Forms
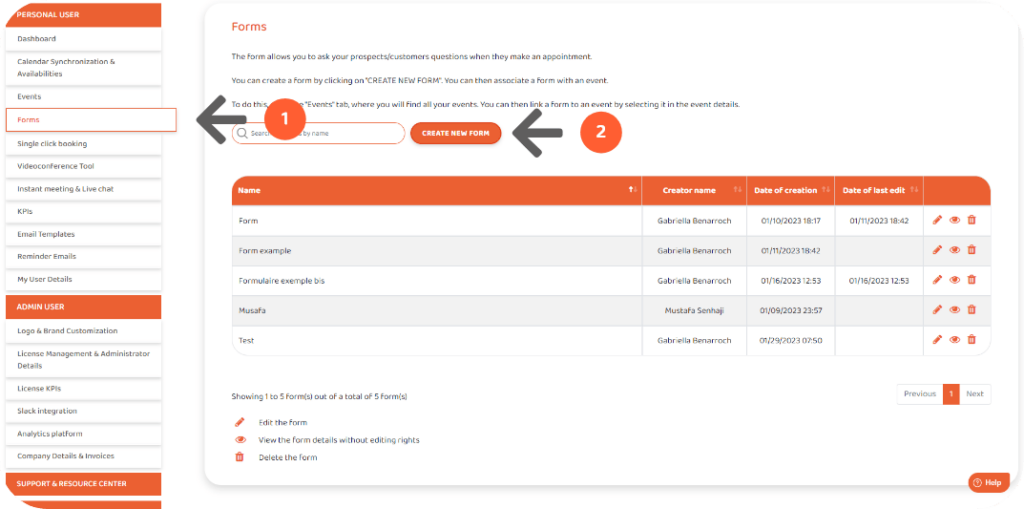
You can create forms – where you can ask people that book a meeting with you any questions you want.
Forms are optional, they are just a possibility. The questions in your form are automatically translated according to the language in which the email is sent, or the language of the browser in which the landing page is located. A single form is therefore sufficient for all languages.
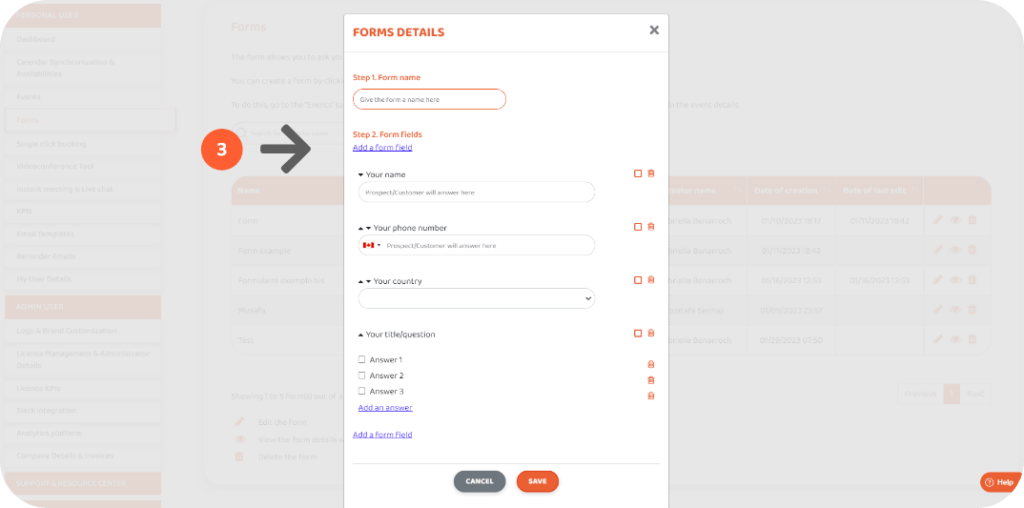
You can change the order of the questions as you wish.
It will also be possible to receive the answers to your forms by email and/or to insert them in the meeting invitation.
- Go to the “Forms” tab;
- Click on “CREATE NEW FORM”;
- Add form fields – such as name, phone number, country, checkbox etc. – and customise the questions. You can also make a question mandatory by ticking the box on the right.
When creating an event, you will be able to associate a form to an event.
- Synchronise your preferred videoconference tool when you make online appointments
Nothing to do if:
o You use Google Calendar & Google Meet
o You use Outlook Calendar/Office 365 & Microsoft Teams
Something to do if:
o You use Google Calendar & Microsoft Teams
o You use Outlook Calendar/Office 365 & Google Meet
o You use Zoom, WebEx, GoToMeeting or any other tools
In that case:
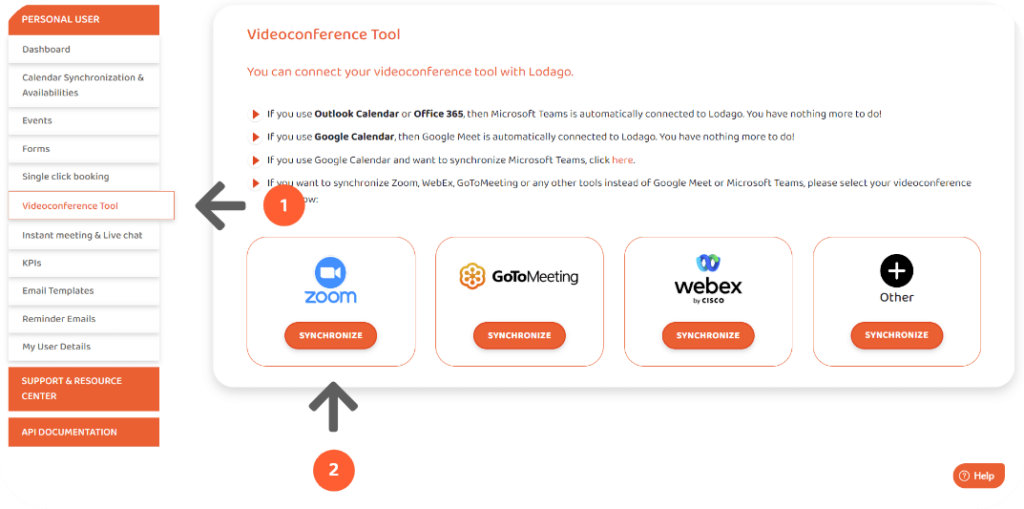
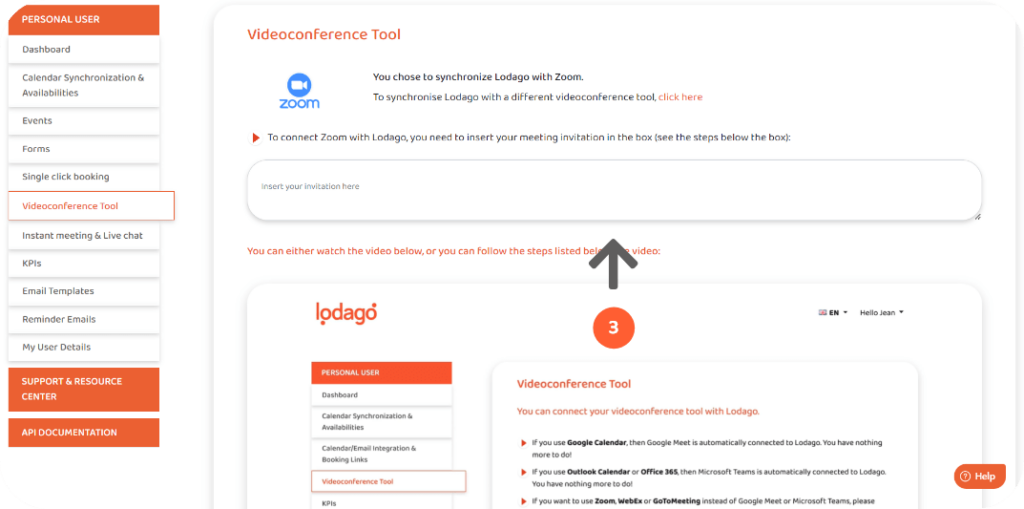
- Go to the “Videoconference tool” tab;
- Select the videoconferencing tool that you would like to use;
- Enter the permanent meeting link of your videoconference software in the box.
- Create event(s)
An event is a set of pre-defined parameters associated with the calendars you share (people synchronized, number of weeks to display, break time, online or offline, duration…).
By default, the event is exclusively displayed in the event list of the creator and the members that are part of the event.
You have the option to display the event in the event list of all the members of the organization. Note that the event details can be edited by the creator, the members that are part of the event and the administrator.
If you are an administrator, you have the list of all the events created by the members of your organization.
If you are a user, you have a list of events that you have created, that you are participating in, or events that have been shared with all members of the organization.
By default, only admins and members of the event can see the event in their event list. If you tick the box, all Lodago users from your organization will be able to see the event in their list, but not modify it. Only admins and users part of the event can modify it.
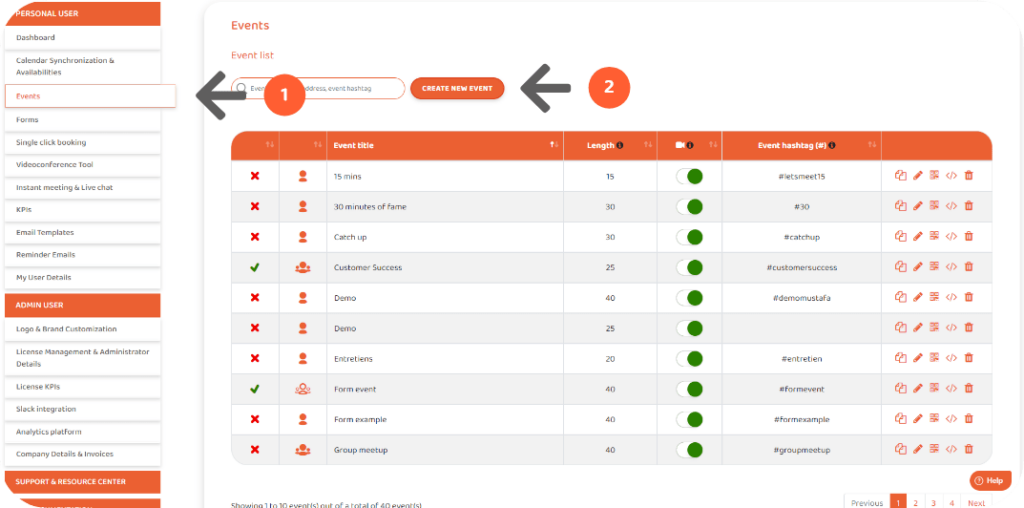
- Go to the “Events” tab;
- Click on Create NEW EVENT;
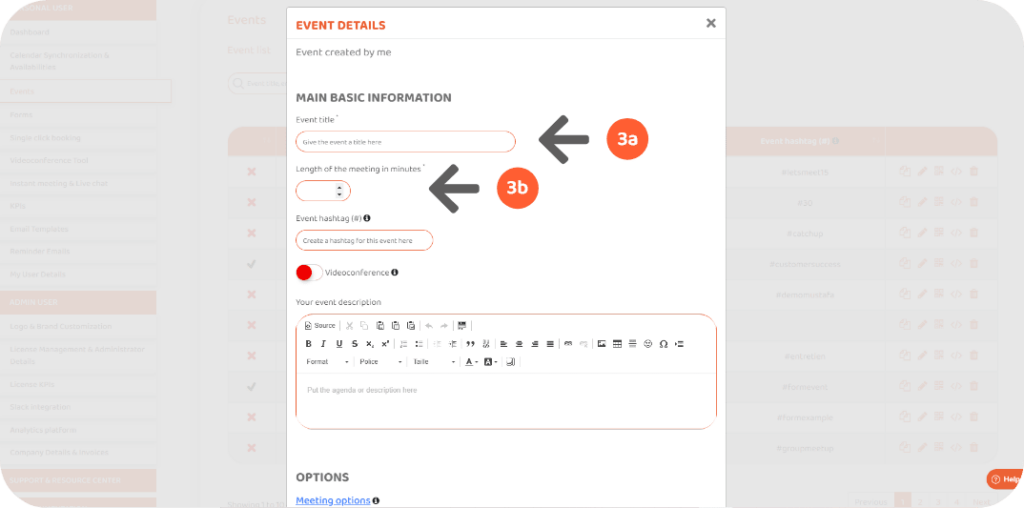
- Fill mandatory details
a. Event title;
b. Event duration.
- Fill optional details
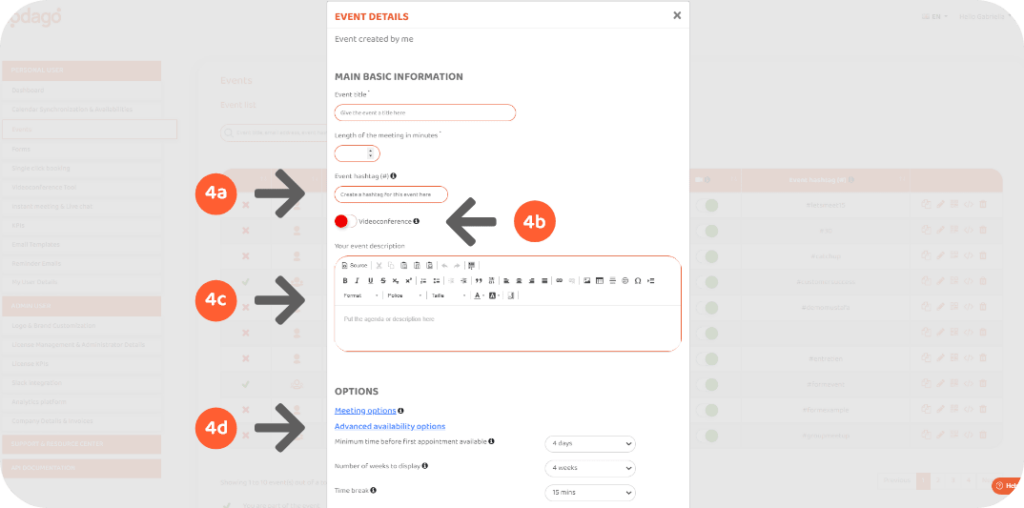
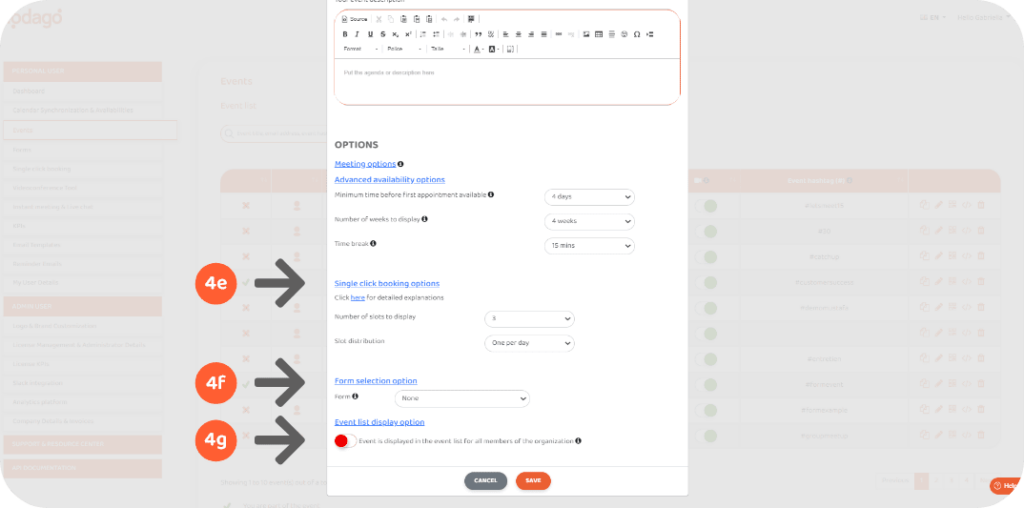
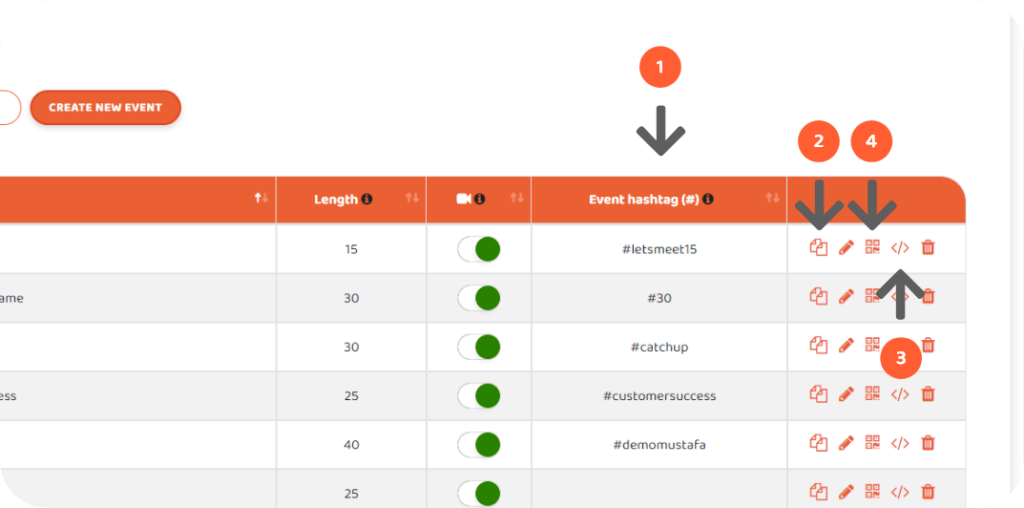
a. Hashtag to integrate calendar directly in your emails – Click here to know more about it;
b. Online meeting by ticking videoconference
c. External facing agenda that describes the purpose of the meeting;
d. Specific availability (minimum time before first appointment available, number of week to display, time break);
Your prospects book a meeting in a single click directly inside the email by selecting a slot from your real-time live availability.
Here, you set up how your availability will be displayed inside the email. Note that if none of the slots suits your(s) recipient(s), it is possible for the recipient to display more days and times by clicking on “Show more dates & times”. See below for more explanation.


- f. Form selection (see the previous step to see how to create a form);
g. Event display option to define which team members can see the event that is created in their event list.
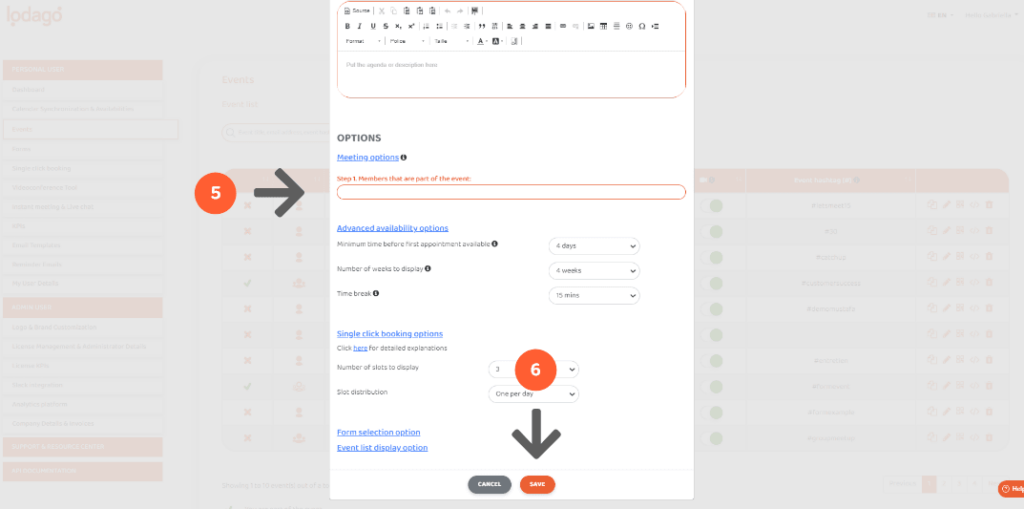
- Set up which members are part of the event;
By default when you create an event, only you are a part of the event. If you leave the “Members that are part of the event” section blank, this event will share your availability (the availability of the event creator).
There are alternatives. You want to create :
- a round robin (in which you are or aren’t a member), click here;
- a group meeting including colleagues (in which you are or aren’t a member) – for internal meetings or external meetings, click here;
- a simple meeting for someone else, click here.
- Click save
- Share your event everywhere
You can share your event in several ways.
- By email using the event hashtag. Click here to know more about it;
- By booking links (through social media – Linkedin, Whatsapp etc., or on website CTAs). Click here to know more about it;
- By integrating the event directly in your website. Click here to know more about it;
- By QR code when at an in-person event. When people scan the QR code, it redirects them to your landing booking page.
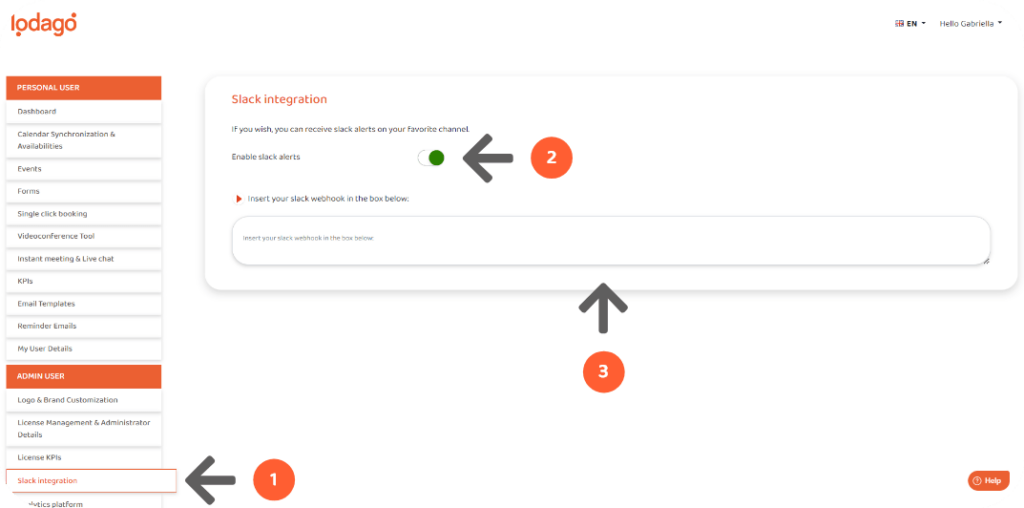
- Enable slack alerts
This will allow you to receive an alert as soon as an appointment is booked via Lodago.
- Go to the “Slack integration” tab;
- Tick “Enable slack alert”;
- Insert your slack webhook in the box below.
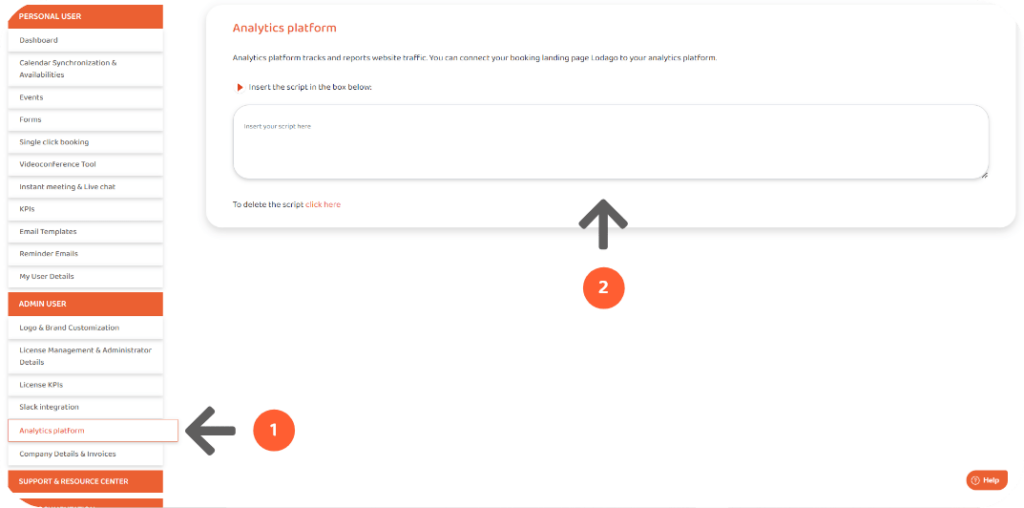
- Enable the analytics platform
The statistics in this section are the statistics for appointments made from a landing page.
- Go to “Analytics platform” tab;
- Insert the script in the box below.
- Invite users to join Lodago
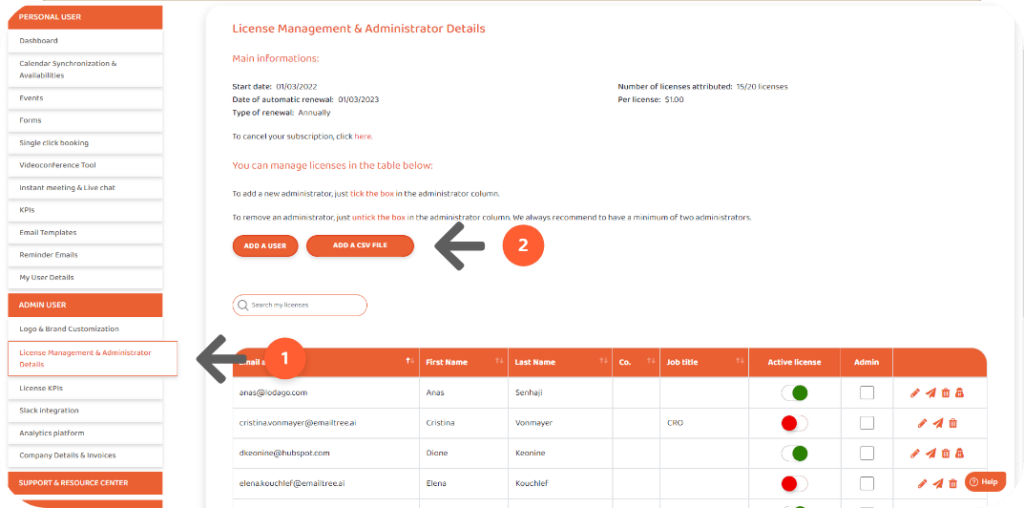
If you subscribe to multiple licenses, you can allocate licenses with a simple email address.
- Go to the “License Management & Administrator Details” tab;
- Click on « Add a user » to add a single user by adding their email address. You can also add a group of users by clicking on « Add a CSV file » with the email addresses of all the users.
We will send them a welcome invite by email with instructions to guide them in their first steps of using Lodago.
You can add/remove users, turn regular users into admins and modify the user details from this tab at any time.
You’re all set!
If you need any help with discovering/using our solution, don’t hesitate to check out our Resource Centre where you will find tutorials for every feature available in Lodago.
You can also contact us if you need anything – directly from your account or by clicking here!
